ROCKNIX formerly known as JELOS is the Linux distribution specialized in retro Rockchip consoles that brings many improvements for them.
The new open source system ROCKNIX offers an interesting alternative for compilations like EmuELEC. This distribution offers interesting features and is compatible with multiple consoles with Rockchip, Amlogic, Allwinner and Snapdragon SoCs. We can even run PC games via Steam on ARM or use specific ports with Portmaster system that allows for example to run games, multiplayer support and touch screen, among other functions.
- Check out the best deals on ROCKNIX Compatible Consoles.
- We recommend a quality SAMSUNG EVO PLUS micro SD card or the cheap LD on AliExpress

What is ROCKNIX?
ROCKNIX (Rockchip Linux) was born as a fork of the very popular JELOS system among different consoles, its creators went on to form this new system by joining forces.
ROCKNIX is a community-developed Linux distribution for portable gaming devices. Our goal is to produce an operating system that has the features and capabilities we need, and to have fun while developing it.
Consoles supported by ROCKNIX
It is possible to run ROCKNIX on multiple consoles, we have system images for each of these machines that must be installed on a micro SD card.
- Official List of Supported Consoles.
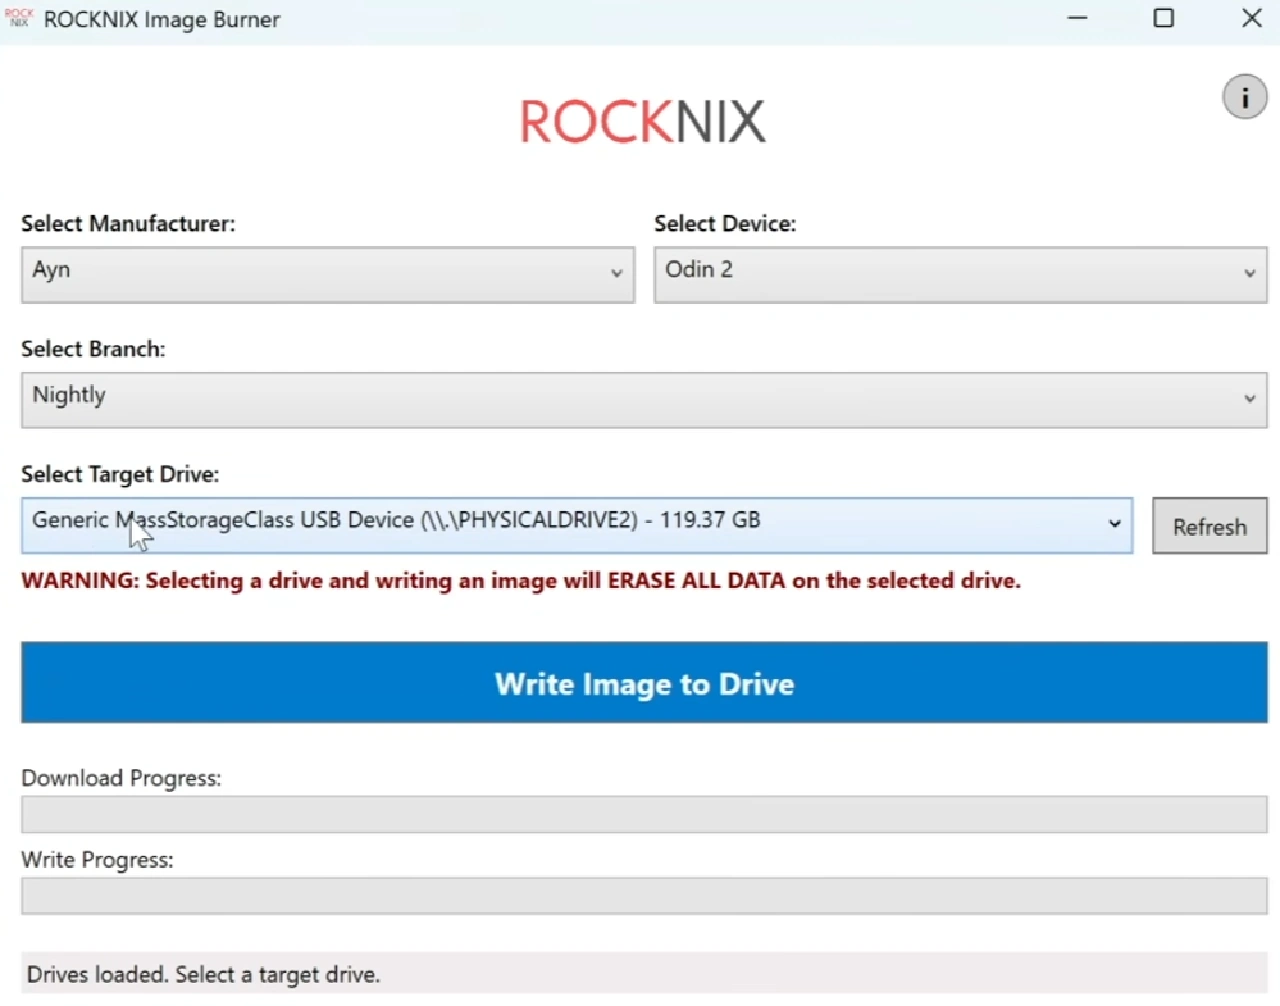
Create an SD card automatically
- Download ROCKNIX Image Burner
- Select your device, the ROCKNIX version, and the drive where you want to install the image.
- If you don’t have your device, you can try another one with the same SoC.
Create an SD manually using IMG
In order to install ROCKNIX follow this tutorial or manual. We need the OS file prepared for our console, an SD drive, SD card reader and a PC to copy files.
- Download ROCKNIX IMG.GZ image file for your console.
- Download balenaEtcher to burn the image.
- We need a quality microSD card of at least 16 GB and a PC card reader.
- We start balenaEtcher, select the IMG.GZ file and the SD drive.
- Click on Flash! and wait for the process to finish.

Configuring the DTB for Rocknix
- Open the SD card in a file explorer
- Go to the device_trees folder and copy the filename for your device.
- Go to the extlinux folder and edit the “extlinux.conf” file
- Edit the FDT line to point to your device’s DTB file.
- Example: “FDT /device_trees/rk3588s-orangepi-5-pro.dtb”
Old DTB method
- Open the device_trees folder
- Copy a compatible DTB file to the root folder of the SD card.
Example Name = Amlogic SoC model (S905X2…) + 2g/4g (RAM) + 1gbit (Ethernet) - Rename the DTB file to “dtb.img”
Dual Boot ROCKNIX and Android
If you have an Android console and don’t want to mess with the existing installation, you can boot ROCKNIX from a microSD card. Then, if you like it, you can always install this OS on the internal storage to improve performance.
- Download ROCKNIX ABL to boot from SD.
- On your console, copy ABL to the root of the internal storage.
- On the console running Android, go to Settings > Advanced > Run Scripts
- First, back up ABL, then flash ABL
- Reboot the console with the Volume Down and Power buttons held down.
- The ROCKNIX ABL menu will appear.
- Use the Volume- button to navigate to Set Device Model and select your device.
- The Boot Mode menu will show Linux; press the Power button to start this OS.
- If you want to switch to Android, follow the same steps, but in Switch Boot Mode, select Android.

ROCKNIX configuration and controls
To start up the ROCKNIX system we must insert the SD card we have prepared into slot 1 of our console.
- Basic Controls:
– Move = With crosshead, analogs and triggers.
– Start = Main menu with settings.
– Select= Shortcuts. - NOTE: Each console has different controls, see ROCKNIX Wiki > Devices.
ROCKCNIX Configuration
Press Start to get to the main menu where we can adjust how games are displayed, system settings, control settings, system network and connect to Moonlight to play via streaming.
- Performance: To control the processor power destined to each emulator we can enter with Start > Game Settings > Per System > System > System Options > CPU Scaling

In the Tools section between the emulators of the main screen we have a file explorer and the settings of each emulator. Here we can adjust in detail the PortMaster settings, backup / restore settings, as well as run the Hatari, PPSSPP, RetroArch and ScummVM emulators to configure them individually.
- Discover how PortMaster works and get the most out of it

Copy ROMS, Games and BIOS to ROCKNIX
We can copy and manage our ROMS and BIOS files in several ways with ROCKNIX, we are going to explain in a simple way how to do it without getting too complicated using a PC.
- First: Create a backup of the SD cards that come with the console.
- Download ROMS and games.
- Download BIOS pack.
Create a folder structure in ROCKNIX using a second microSD card
We only have to insert a micro SD card in slot 2 of our console, it will automatically generate a folder structure in this card to work with it.
- Turn on the console and wait for it to boot.
- Put SD card in the slot 2 of our console.
- Take out SD card in a card reader in our PC.
- Inside the SD card we will find the Roms folder
- We have a folder for each console that can be emulated.
- The bios folder is for the BIOS files of the consoles
- The ports folder is for Portmaster.
- Other special folders, like screenshots, savestates, doom, mplayer… we have more information in the ROCKNIX WIKI to understand them.

Copying ROMs and BIOS to the ROCKNIX microSD Card Without a Second SD Slot
If you don’t have a second microSD slot or want to use the same SD card where ROCKNIX is installed to store the BIOS and ROMs, you can do so.
- NOTE: By default, ROCKNIX creates its primary partition in the EXT4 file system, which cannot be viewed in Windows.
Copying files to the ROCKNIX SD card using Linux
We can’t see the partition from Windows, but we can see it using a Linux PC.
- Remove the ROCKNIX microSD card and insert it into a card reader on your Linux PC.
- Copy the ROMs and BIOS files you need into the appropriate folders.
- Reinsert the microSD card into your device.
Copying files to the ROCKNIX SD card over the network using SAMBA
We can also copy the necessary files over the network from our PC to the console, box, or board where ROCKNIX is installed.
- Go to Start > Menu > Network > Enter the IP address > Verify that SAMBA is enabled
- From a PC, enter our IP address in the file explorer. Example: “\\192.168.1.1XX”
- Inside “games-roms,” we can copy the ROMs and BIOS files
- Copying files to the ROCKNIX SD card using the internal file explorer
Using the system’s own file explorer, it is possible to copy the necessary files to the SD card.
- Copy our organized BIOS and ROM files to a USB drive formatted in exFAT or FAT32.
- Connect the USB drive to your console or board running ROCKNIX
- In ROCKNIX, go to Tools > File Manager
- Go to the system root by clicking “..” until you reach “\”
- Go to “media”
- Inside, you will see your USB drive
- Open the menu and select the folders or files highlighted in red using the “Y” button on the Xbox controller, then press ‘X’ to select “Copy” from the menu.
- Go back to the internal SD card at “/storage/roms/” and paste the files you want.